Drawing the same product outline dozens of times is a poor use of an annotator's attention. The interesting work is deciding which object belongs to which class, where its boundary really ends, and whether the result is good enough for training. In our Label Assist walkthrough, we bring model-generated boxes and masks into our own annotation interface so that people can review useful starting points instead of tracing every object from scratch.
This article explains the design behind that workflow: promptable segmentation, prediction review, and the coordinate and state handling that make assistance useful inside an editor. It is an engineering companion to the demonstration, rather than a claim that our implementation is Roboflow's software or uses its private internals.
The useful output is an editable proposal
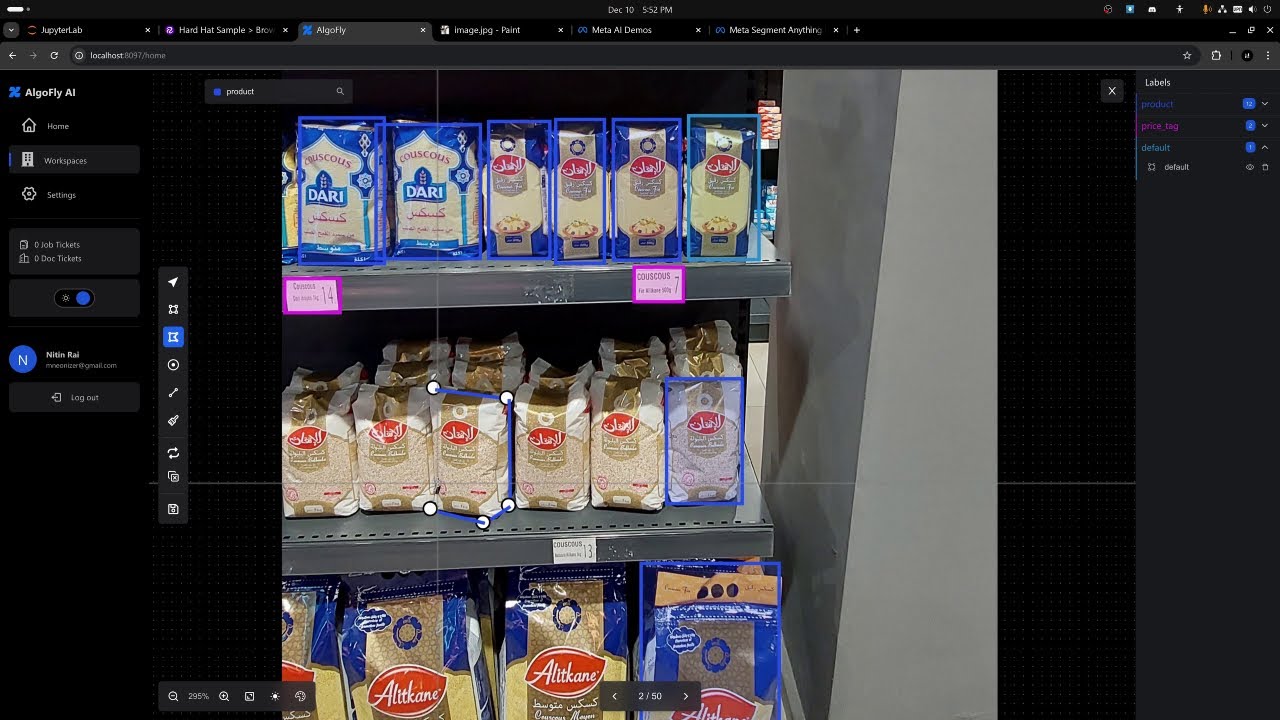
A labeling assistant should deliver an object the editor already understands. A mask that can only be viewed in a separate preview has limited value. An editable polygon with the right class, image association, and undo history can become part of a real dataset. The product shelf shown in the walkthrough is a good example: neighboring packages look similar, the image contains both products and price tags, and a plausible outline still needs someone to confirm its meaning.
That distinction determines the interaction. Ask for a prediction, show it as a proposal, allow correction, and accept it into the annotation set deliberately. Keep rejection cheap. If every incorrect suggestion requires several clicks to remove, the assistant simply exchanges drawing work for cleanup work. A short route back to the manual tools is part of the feature.
Where Segment Anything fits
Meta's original Segment Anything model accepts prompts such as points or boxes and predicts masks. Its image encoder can process an image once, allowing later prompts to use that image representation. This makes it suitable for interactive assistance, where an annotator may refine the same object several times.
Segmentation and semantic classification are separate responsibilities. A mask around a bottle does not, by itself, establish its brand or SKU. A class can come from the annotator, a separate detector, or an application-specific recognition step. Treating a mask score as a class probability blurs that boundary and can create incorrectly labeled data that looks visually convincing.
For an initial integration, one image and one prompt are enough. Load the image, let the user indicate the object, obtain candidate masks, and make the selected candidate editable. Automatic labeling across a whole dataset is a later workflow with different review, progress, cancellation, and failure-handling requirements.
Build the interaction around correction
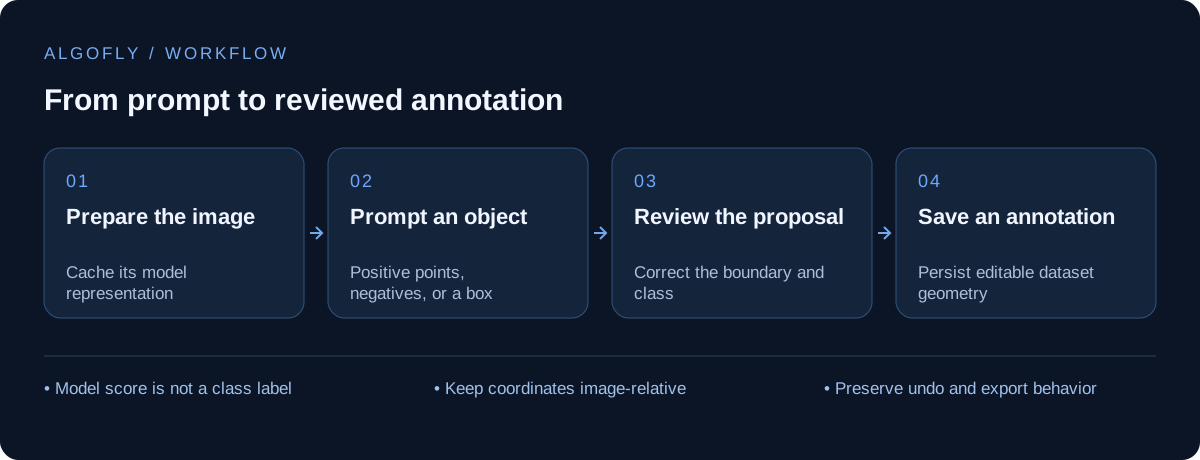
- Open an image and prepare its model representation.
- Capture a positive point or box around the intended object.
- Display candidate geometry without silently replacing saved annotations.
- Allow additional positive or negative points when nearby objects are included.
- Assign or confirm the class, then accept the proposal.
- Save through the same path used by manually drawn objects.
Negative prompts are particularly useful on crowded shelves. A positive point may identify the correct package but include a neighboring one; a negative point communicates which region to exclude. When several candidates are available, showing a small number of alternatives is often more understandable than asking the user to interpret an internal confidence number.
The interface should also make the current image and current prompt unambiguous. If a user changes images while inference is running, discard the old response when it returns. A fast model does not eliminate this race: network requests, image decoding, and queueing can still change response order.
Keep model coordinates out of your saved dataset
The image on screen may be zoomed, panned, resized, or letterboxed. The model may receive another resolution. The dataset needs coordinates relative to the original image. Those are three distinct coordinate systems. A polygon that lines up at one zoom level can still be wrong when exported if the application saves canvas pixels directly.
A simple example illustrates the mapping. Suppose the rendered image begins at (left, top), and its displayed dimensions exclude the surrounding padding. For an unrotated image, normalize a click before converting it to source pixels:
# Illustrative mapping for an unrotated, axis-aligned image.
u = (pointer_x - left) / displayed_width
v = (pointer_y - top) / displayed_height
source_x = u * original_width
source_y = v * original_height
Reject clicks outside the displayed image. If rotation or a more general canvas transform is involved, apply the inverse transform instead of extending this formula with ad hoc offsets. Test non-square images and objects near the border: centered examples often hide coordinate mistakes.
Preserve the shape when importing a mask
Converting a binary mask into annotation geometry requires an explicit format decision. A rectangular box is compact but loses the object's outline. A polygon preserves more boundary detail but may need multiple components or holes. A raster mask retains pixel-level structure and can be the better representation when the export format supports it.
Do not collapse every result into a single contour without considering what gets lost. Two disconnected parts of the same visible object may be valid. Over-aggressive simplification may cut away narrow features, while a contour with thousands of points can make editing unpleasant. The right compromise depends on the training format and the review tools, not only on what is easiest to draw on a canvas.
Accepted geometry should receive the same lifecycle as a manual annotation: class association, stable ID, undo and redo, modification tracking, persistence, and export. Otherwise an assisted polygon can appear correct but disappear after reload or fail to participate in later transformations.
Measure the work saved after review
Inference latency alone is an incomplete measure of labeling speed. Track time from opening an image to saving reviewed annotations, along with acceptance and correction rates. A model that returns instantly but proposes too many incorrect objects can make the total task slower. Evaluate difficult cases separately: partial objects, glare, occlusion, repeated packaging, thin boundaries, and low-resolution crops.
Keep a small human-reviewed reference set outside the assisted production flow. Compare exported annotations against it, including class IDs and coordinate conventions. This catches failures that a visually attractive preview will not reveal. Speed claims should follow those measurements; the walkthrough does not establish a universal acceleration factor for every dataset.
Start small, then expand the workflow
The practical first milestone is one reliable loop: prompt an object, correct the proposed boundary, accept it, reload the image, and export the same geometry. Once that loop is trustworthy, add prediction batches, class-specific detectors, or more advanced segmentation models. Model upgrades are much easier when the editor already has a clear contract for proposed and accepted annotations.
For more examples of turning vision models into useful applications, see our image embedding training guide and the retail product detection walkthrough.