How to Train a Custom OCR Model with Florence-2 on Limited Data
Move beyond generic OCR. Learn how to fine-tune Microsoft's powerful Florence-2 Vision Language Model on your custom dataset to extract exactly the text you need with incredible accuracy.
Optical Character Recognition (OCR) has been a long-standing challenge in computer vision. While traditional models like EasyOCR or PaddleOCR are powerful, they often require complex setups and, most painfully, tedious data annotation involving bounding boxes. Furthermore, they can struggle to isolate specific information when an image is cluttered with irrelevant text.
But what if we could simply show a model what to read?
Enter the new generation of Vision Language Models (VLLMs). In this guide, we’ll walk you through how to fine-tune Microsoft’s Florence-2, a compact yet powerful VLLM, to create a specialized OCR model. We'll train it to read the main display on an energy meter, ignoring all other texta task that stumps many out-of-the-box solutions.
Let's get started!
The Workflow
Our process is broken down into three main stages:
- Data Preparation: We'll structure our custom dataset in a simple format that requires no bounding boxes.
- Model Training: We'll write a PyTorch script to load the pre-trained Florence-2 model and fine-tune it on our data.
- Inference: We'll test our newly trained model to see how it performs on the specific OCR task.
Step 1: Preparing the Dataset 📝
The key to this entire process is how we structure our data. The beauty of this approach is its simplicity. All you need are images and a corresponding text file with the ground truth label.
Directory Structure
First, organize your dataset into a root directory containing train and val (validation) subdirectories. This separation is crucial for training a robust model that doesn't just memorize the training data.
/data/
|-- train/
|   |-- img_001.jpg
|   |-- img_001.txt
|   |-- img_002.jpg
|   |-- img_002.txt
|   `-- ...
`-- val/
    |-- img_101.jpg
    |-- img_101.txt
    |-- img_102.jpg
    |-- img_102.txt
    `-- ...
Annotation Format
For each image (.jpg), create a text file (.txt) with the exact same name. Inside this text file, place only the text you want the model to extract.
For example, if img_001.jpg shows a meter reading of "04059.8", the content of img_001.txt will be:
04059.8
That’s it! No coordinates, no bounding boxes. This simple format makes data preparation incredibly fast.
Step 2: Training the VLLM 🧠
Now for the fun part. We'll use the Hugging Face transformers library to load Florence-2 and fine-tune it with our custom data.
You can also find all the training notebooks here:

Setup and Dependencies
First, ensure you have the necessary libraries installed. The most important ones are torch, transformers, and Pillow.
pip install torch transformers Pillow timm einops
Loading the Model and Processor
We start by loading the pre-trained Florence-2 base model and its associated processor. The processor handles the conversion of our images and text prompts into the format the model expects.
import torch
from transformers import AutoModelForCausalLM, AutoProcessor

# Define the model ID and device
model_id = 'microsoft/Florence-2-base'
device = torch.device("cuda" if torch.cuda.is_available() else "cpu")

# Load the model and processor
model = AutoModelForCausalLM.from_pretrained(model_id, trust_remote_code=True).to(device)
processor = AutoProcessor.from_pretrained(model_id, trust_remote_code=True)
Creating the Dataset and DataLoader
Next, we create a custom PyTorch Dataset to load our images and text files. This class will read an image, open its corresponding .txt file, and return them as a pair.
class OCRDataset(Dataset):
    def __init__(self, images_root, prompt="<OCR>", resize=None):
        self.images = glob.glob(images_root+"/*.jpg")
        self.resize = resize
        self.prompt= prompt

    def __len__(self):
        return len(self.images)

    def __getitem__(self, idx):
        image_path = self.images[idx]
        label_path = self.images[idx].replace(".jpg", ".txt")

        if (not os.path.exists(image_path)) or (not os.path.exists(label_path)):
            return self.__getitem__(idx-1)

        image = Image.open(image_path)
        if self.resize is not None:
            image = image.resize(self.resize)

        image = image.convert("RGBA").convert("RGB")

        with open(label_path) as f:
            label = f.read().strip().rstrip("DH").strip()
            if not label:
                return self.__getitem__(idx-1)

        return self.prompt, label, image

def collate_fn(batch):
    questions, answers, images = zip(*batch)
    inputs = processor(text=list(questions), images=list(images), return_tensors="pt", padding=True).to(device)
    return inputs, answers

BATCH_SIZE = 4
train_dataset = OCRDataset("./dataset/energy-meter/train", resize=(256, 128))
val_dataset = OCRDataset("./dataset/energy-meter/val", resize=(256, 128))
train_loader = DataLoader(train_dataset, batch_size=BATCH_SIZE, collate_fn=collate_fn, num_workers=0, shuffle=True)
val_loader = DataLoader(val_dataset, batch_size=BATCH_SIZE, collate_fn=collate_fn, num_workers=0)
The Training Loop
This is the core of our fine-tuning process. We loop through our training data for a specified number of epochs, feeding batches to the model, calculating the loss, and updating the model's weights using an optimizer. The task prompt <OCR> tells Florence-2 what operation to perform.
def train_model(train_loader, val_loader, model, processor, device, epochs=10, lr=1e-6):
    optimizer = AdamW(model.parameters(), lr=lr)
    num_training_steps = epochs * len(train_loader)
    lr_scheduler = get_scheduler(
        name="linear",
        optimizer=optimizer,
        num_warmup_steps=0,
        num_training_steps=num_training_steps,
    )

    last_val_loss = float('inf')

    for epoch in range(epochs):
        model.train()
        train_loss = 0

        # Train loop with progress bar
        progress_bar = tqdm(train_loader, desc=f"Training Epoch {epoch + 1}/{epochs}")
        for batch in progress_bar:
            inputs, answers = batch

            input_ids = inputs["input_ids"].to(device)
            pixel_values = inputs["pixel_values"].to(device)
            labels = processor.tokenizer(text=answers, return_tensors="pt", padding=True, return_token_type_ids=False).input_ids.to(device)

            outputs = model(input_ids=input_ids, pixel_values=pixel_values, labels=labels)
            loss = outputs.loss

            loss.backward()
            optimizer.step()
            lr_scheduler.step()
            optimizer.zero_grad()

            train_loss += loss.item()

            inputs["input_ids"].detach()
            inputs["pixel_values"].detach()
            del inputs, outputs
            torch.cuda.empty_cache()

        avg_train_loss = train_loss / len(train_loader)

        model.eval()
        val_loss = 0

        with torch.no_grad():
            for batch in tqdm(val_loader, desc=f"Validation Epoch {epoch + 1}/{epochs}"):
                inputs, answers = batch

                input_ids = inputs["input_ids"].to(device)
                pixel_values = inputs["pixel_values"].to(device)
                labels = processor.tokenizer(text=answers, return_tensors="pt", padding=True, return_token_type_ids=False).input_ids.to(device)

                outputs = model(input_ids=input_ids, pixel_values=pixel_values, labels=labels)
                val_loss += outputs.loss.item()

            inputs["input_ids"].detach()
            inputs["pixel_values"].detach()
            del inputs, outputs
            torch.cuda.empty_cache()

        avg_val_loss = val_loss / len(val_loader)
        tqdm.write(f"Average Validation Loss: {avg_val_loss}")

        # Save latest model
        save_model_and_processor(model, processor, "./weights/model_latest")

        if avg_val_loss < last_val_loss:
            last_val_loss = avg_val_loss
            # Save best model
            save_model_and_processor(model, processor, "./weights/model_best")

# We will freeze image encoder for faster training.
for param in model.vision_tower.parameters():
    param.is_trainable = False

train_model(train_loader, val_loader, model, processor, device, epochs=50)
Step 3: Inference and Performance 🚀
After training, the real test is seeing how our specialized model performs. We load our saved model weights and run it on a sample image.
Before Fine-Tuning
The base model extracts a lot of irrelevant text and gets the main reading wrong. Output: "REV.kWh 1000 imp/kWh CL200 240V 3W TYPE L2S 30TA 1.0Kh FM2S 60Hz WATTHOUR METER 14054 CA 0.5S"

After Fine-Tuning
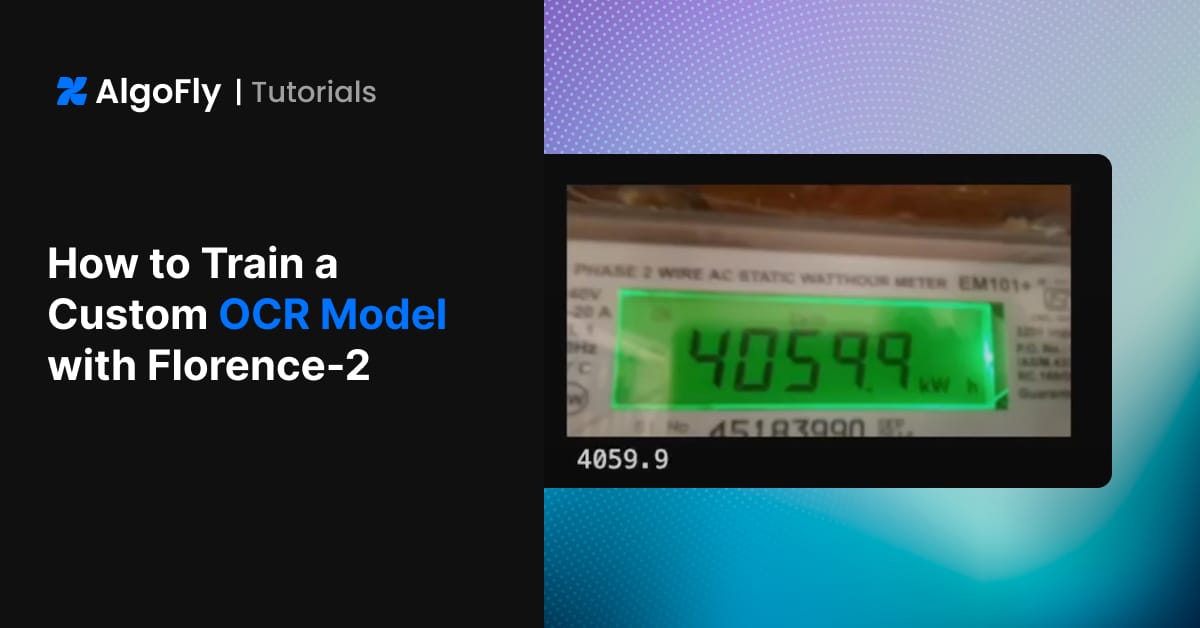
Our fine-tuned model ignores everything else and perfectly extracts the meter reading. Output: 04059.8

The difference is night and day. By training on a targeted dataset, our model learned to focus on the exact information we care about, achieving over 90% accuracy on the validation set.
Conclusion
Fine-tuning Vision Language Models like Florence-2 represents a paradigm shift for custom OCR. It democratizes the creation of highly specialized and accurate models by removing the biggest barrier: complex data annotation.
This approach is not only faster to set up but also yields a more reliable model that understands the context of your specific task. Whether it's reading meters, invoices, or license plates, this technique empowers you to build a solution that just works.